To solve a Rubik's Cube, solve it one layer at a time in 7 steps: (1) make a daisy, (2) turn it into a white cross, (3) solve the white corners, (4) solve the middle layer, (5) make a yellow cross, (6) match the yellow edges, and (7) place and twist the yellow corners. You only need six short move sequences. Most people learn the whole method in about an hour.
Each picture shows where the matching animated demo on the web page starts. Pieces that don't matter yet are gray. Do the moves under it to get the result described.
Every move sequence below comes with an animated cube. Press Play to watch it, or step through one move at a time with ◀ and ▶. Pieces that don't matter yet are gray, so you can see exactly what each step changes.
- Notation
- 1 Daisy
- 2 White cross
- 3 White corners
- 4 Middle layer
- 5 Yellow cross
- 6 Yellow edges
- 7 Yellow corners
- Cheat sheet
Download the printable PDF 7 pages, 234 KB · Letter, prints on A4
Before You Start: Cube Parts and Notation
The three kinds of pieces
- Centers (6) have one sticker and never move relative to each other. The center tells you the color of its whole face.
- Edges (12) have two stickers and sit between two centers.
- Corners (8) have three stickers.
Solving the cube means putting every edge and corner next to the centers that match its colors. On a standard cube, white is opposite yellow, green is opposite blue, and red is opposite orange. If your cube uses different colors, the steps still work. Just swap the color names.
How to hold the cube in this guide
In step 1, hold the cube with the yellow center on top. Keep yellow on top for the rest of the guide. The white layer ends up on the bottom, and you never flip the cube over. The animations use green as the front, orange on the right, red on the left and blue at the back. When a step says "front", it means whichever side is facing you.
How to read the moves
| Letter | Face | Clockwise turn (as you look at that face) |
|---|---|---|
| R | Right | The front of the right side moves up |
| L | Left | The front of the left side moves down |
| U | Up (top) | The front of the top layer moves to the left |
| D | Down (bottom) | The front of the bottom layer moves to the right |
| F | Front | Turn it like a steering wheel to the right |
An apostrophe means the opposite direction (R' moves the front of the right side down), and a 2 means a half turn (U2). When you read a sequence like R U R' U', do the moves in order without turning the whole cube in your hands. There's more detail in the Rubik's Cube notation guide.
Step 1: Make the Daisy
Goal: four white edges around the yellow center, with their white stickers facing up. It looks like a flower with a yellow middle and white petals.
Hold the cube with yellow on top and look for white edge pieces (two stickers, one of them white). You don't need algorithms here, just a few single turns. Where the white edge is decides what you do:
- In the middle layer: turn the side it's on so the edge rises to the top, with its white sticker landing face up. Before you turn, make sure the petal spot it will land in is empty. If it's already taken, turn the top (U) first to move a gap there.
- On the bottom, white facing down: turn the top until the empty petal spot is directly above it, then turn that side twice (for example F2).
- On the bottom or top with white facing sideways: turn that side once to move the edge into the middle layer, then use the first case.
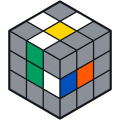
R
A white edge sits in the middle layer, next to an empty petal spot.
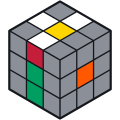
U F2
A white edge is on the bottom, and the spot above it is taken.
Tip: the daisy only cares about the four white edges. Don't worry about the white corners or any other pieces yet. They get fixed later.
Load my cube at step 1 Partway through this step with a scrambled cube? Enter its colors in the solver and it shows only the moves that finish step 1, using this guide's moves.
Step 2: Make the White Cross
Goal: a white cross on the bottom, with the side sticker of each white edge matching the center above it.
Look at one petal's side sticker, the one that isn't white. Turn the top layer until that sticker sits above the center of the same color. Then turn that side twice. The edge swings down to the bottom, with white facing down. Repeat for all four petals.
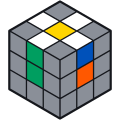
F2 U R2 U2 B2 U L2
The daisy: four white edges around the yellow center.
Now turn the cube over to check the white cross on the bottom. Each white edge's other color should match the center next to it. Then turn it back so yellow is on top again.
Load my cube at step 2 Partway through this step with a scrambled cube? Enter its colors in the solver and it shows only the moves that finish step 2, using this guide's moves.
Step 3: Solve the White Corners
Goal: the whole bottom layer done, with white on the bottom and the sides of the first layer matching their centers.
Find a corner in the top layer that has a white sticker. Look at its other two colors. It belongs between the two centers with those colors. For example, the white, green and orange corner goes between the green and orange centers. Turn the top until the corner sits directly above that spot. Then hold the cube so the spot is at the front right, bottom, and repeat R U R' U' until the corner drops in correctly.
The number of repeats depends on where its white sticker faces. It's never more than five:
| White sticker faces | Repeat R U R' U' |
|---|---|
| Right | 1 time |
| Up | 3 times |
| Front (toward you) | 5 times |
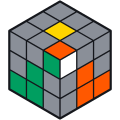
R U R' U'
White corner above its slot, white sticker facing right.
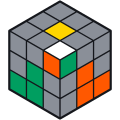
(R U R' U') × 3
White sticker facing up.
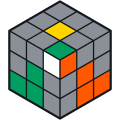
(R U R' U') × 5
White sticker facing you.
Do the same for all four corners. The white cross stays intact between repeats. R U R' U' only borrows the front-right slot and puts it back.
Troubleshooting: the white corner is stuck in the bottom layer
If a white corner is on the bottom but in the wrong spot, or in the right spot but twisted, hold it at the front right, bottom, and do R U R' U' once. That lifts it into the top layer. Then solve it like any other top-layer corner.
Load my cube at step 3 Partway through this step with a scrambled cube? Enter its colors in the solver and it shows only the moves that finish step 3, using this guide's moves.
Step 4: Solve the Middle Layer
Goal: the bottom two layers done. Only the yellow top layer is left.
Find an edge in the top layer that has no yellow on it. Turn the top until its front sticker matches the center below it, and turn the whole cube so that center faces you. Now look at the edge's top sticker. It tells you which way it goes:
- If the top sticker matches the right center, use U R U' R' U' F' U F.
- If it matches the left center, use U' L' U L U F U' F'.
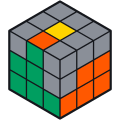
U R U' R' U' F' U F
The top-front edge matches the green center and belongs on the right.
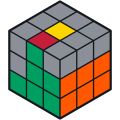
U' L' U L U F U' F'
The top-front edge matches the green center and belongs on the left.
The two sequences mirror each other. The first move turns the top away from where the edge is going, and the edge then drops into place with its corner.
Troubleshooting: every top edge has yellow
If no top edge is free of yellow but the middle layer still isn't solved, a middle edge is in the wrong place or flipped. Hold the cube so that edge is at the front right, and do the right-hand sequence U R U' R' U' F' U F once. That pops it into the top layer, where you can solve it normally.
Load my cube at step 4 Partway through this step with a scrambled cube? Enter its colors in the solver and it shows only the moves that finish step 4, using this guide's moves.
Step 5: Make the Yellow Cross
Goal: a yellow cross on top. Ignore the corners for now, and don't worry about the side colors of the edges yet.
Look only at the top face's edges (not the corners). You'll see one of four patterns: a cross (skip this step), a line, an L shape, or just the yellow center (a dot). One sequence handles all three of the others:
F R U R' U' F'
- Line: hold it horizontally (left to right), then do the sequence once.
- L shape: turn the top so the L points to the back and the left (like the hands of a clock at 9 o'clock and 12 o'clock), then do the sequence twice.
- Dot: do the sequence once to get an L, turn it to the back left, then do the sequence twice.
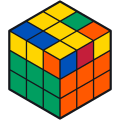
F R U R' U' F'
A horizontal yellow line.
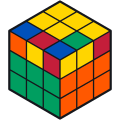
(F R U R' U' F') × 2
A yellow L shape at the back left.
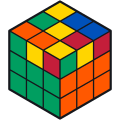
F R U R' U' F', U2, then (F R U R' U' F') × 2
Only the yellow center (a dot).
The bottom two layers are restored automatically after each sequence. If they're not, a move was done the wrong way round. Undo it and try again.
Load my cube at step 5 Partway through this step with a scrambled cube? Enter its colors in the solver and it shows only the moves that finish step 5, using this guide's moves.
Step 6: Match the Yellow Edges
Goal: each yellow edge's side sticker matches the center below it.
Turn the top layer until at least two edges match their centers. There are three possibilities:
- All four match: skip to step 7.
- Two neighboring edges match: hold the cube so those two are at the back and on the right, then do R U R' U R U2 R' U.
- Two opposite edges match (front and back, or left and right): do R U R' U R U2 R' U once from any side. Then turn the top until two neighboring edges match, and use the case above.
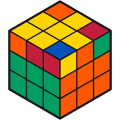
R U R' U R U2 R' U
Back and right edges match their centers. Front and left don't.
This sequence is famous enough to have a name. The first seven moves are called the Sune, and speedcubers use it all the time.
Load my cube at step 6 Partway through this step with a scrambled cube? Enter its colors in the solver and it shows only the moves that finish step 6, using this guide's moves.
Step 7: Place and Twist the Yellow Corners
The last step has two parts. First move each corner to its correct spot, then twist them until yellow faces up.
7a. Put the corners in the right spots
A corner is "in the right spot" when its three colors match the three centers around it, even if it's twisted. For example, the yellow, green and orange corner belongs at the front-right top. Find a corner that's already in its spot, hold the cube so that corner is at the front right, top, and do:
U R U' L' U R' U' L
This swaps the other three corners around while the front-right one stays put. Check again, and repeat if needed. It usually takes one or two goes. If no corner is in its spot, do the sequence once from any side, and one will be.
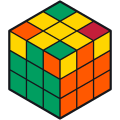
U R U' L' U R' U' L
The front-right top corner is in its correct spot (even if twisted). The other three aren't.
7b. Twist the corners
Hold the cube so a corner that isn't twisted correctly sits at the front right, top. Repeat R' D' R D until that corner's yellow sticker faces up. That takes 2 or 4 times.
Don't panic: the bottom layers will look scrambled while you do this. That's expected. Keep going, and they come back once every corner is twisted.
Then turn only the top layer (U) to bring the next unsolved corner to the front right, top, and repeat R' D' R D again until its yellow faces up. Don't turn the whole cube during this part. When every corner shows yellow on top, turn the top layer until it lines up. The cube is solved.
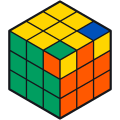
(R' D' R D) × 2, U, (R' D' R D) × 4, U'
Two corners in place but twisted.
Load my cube at step 7 Partway through this step with a scrambled cube? Enter its colors in the solver and it shows only the moves that finish step 7, using this guide's moves.
All 7 Steps on One Page
| Step | Goal | What to do |
|---|---|---|
| 1 Daisy | 4 white edges around the yellow center | Single turns. Clear a spot with U before moving an edge up. |
| 2 White cross | White cross on the bottom, matched to the side centers | Match a petal to its center, then turn that side twice (F2) |
| 3 White corners | First layer done | R U R' U' × 1, 3 or 5 |
| 4 Middle layer | Two layers done | Right: U R U' R' U' F' U F Left: U' L' U L U F U' F' |
| 5 Yellow cross | Yellow cross on top | F R U R' U' F' (line ×1, L ×2) |
| 6 Yellow edges | Edges match their side centers | Matched pair at back and right: R U R' U R U2 R' U |
| 7a Corner spots | Every corner in its spot | Good corner at front right: U R U' L' U R' U' L |
| 7b Corner twists | Yellow faces up on every corner | R' D' R D × 2 or 4, then U to the next corner |
Stuck? Let the Solver Show You
If something goes wrong and you can't tell what, enter your cube's colors in the Rubik's Cube solver. It finds a short solution and animates every move, so you can get back to solved and try again.
What to Learn Next
Once you can solve it without looking at this page, most people want to get faster. The usual next step is the "2-look" last layer from the CFOP method, which replaces steps 5 to 7 with a handful of quicker sequences. See 2-look OLL and the full list of Rubik's Cube algorithms. Time your solves with a cube timer to see your progress. Got a bigger cube? The 4x4 guide turns it into a 3x3 and then uses this method. Got a smaller cube too? The 2x2 guide reuses this page's steps for the white corners and for twisting the yellow corners.
FAQ
How long does it take to learn to solve a Rubik's Cube?
About an hour for most people to solve it once with this guide, and a few days of practice to do it from memory. First solves often take 5 to 10 minutes. With practice, many people get the beginner method down to 1 to 3 minutes, though everyone's pace differs.
Is there a way to solve it in 3 steps?
Some guides group the steps differently (first layer, second layer, last layer), but the work is the same. You still need about six move sequences. There's no shortcut that skips them.
Why does my cube look broken in step 7?
Repeating R' D' R D mixes up the bottom layers temporarily. As long as you only turn the top layer between corners and never turn the whole cube, everything comes back once all the corners are twisted correctly.
What's the fastest way to solve a Rubik's Cube?
Most speedcubers use the CFOP method (Cross, F2L, OLL, PLL). It builds on the same layer-by-layer idea as this guide but solves several pieces at once. It uses more algorithms, and it's how top solvers get under 10 seconds.
My cube has different colors. Does this still work?
Yes. Use the color opposite your starting color in place of yellow, and follow the same steps. The moves don't depend on the colors.